
eRez Imaging Server 3.1
Working with
Digital Master Images
04-may-2005
Copyright 2001-2005 YaWah.com. All Rights Reserved
Table of contents
The Anatomy of a Digital Master Image
Color Management and ICC profiles
Composed images – more than pixels
Resolution independence and real-time rendering
Preparing resolution independent TIFF images
Automatic conversion using the eRez Imaging Server
Automatic conversion using Khufu and Adobe Photoshop
Using Adobe Photoshop 7.0 or later
Using Adobe Photoshop 5.0 and 6.0
Note: A later version of this document or additional information may be available on the YaWah.com website. Please consult the page: http://www.yawah.com/support/erez2.html.
What is a Digital Master?
A Digital Master is an image, line-art, video or other kind of media file, created and stored in a way that ensures the highest level of reuse and re-expression. A digital master has not been prepared and optimized for a particular use, such as a printed magazine or use on the internet. It is a “mother” file from which variations for specific uses can be derived easily.
A carefully crafted digital master is a valuable asset that can be repurposed and reused over period of many years.
On the other hand, a media file optimized for, and therefore limited to, a specific type of use is normally short-lived and represents less value. Such “orphan” media files may only be of interest for of a few weeks or months.
An example of an orphan file is an image optimized for display on a web page. Such an image is inappropriate for use in a printed magazine because the resolution has been reduced dramatically.

A digital master can be reused and re-expressed for many uses.
The Anatomy of a Digital Master Image
Resolution
A digital master image must be stored at a sufficiently high resolution (amount of pixel information) to accommodate for the variety of ways in which it might be used in the foreseeable future. The higher the resolution, the more likely it is that the image will meet your future requirements. It is simple reduce the resolution of an image – but once the information is gone, it is lost for good.
Resolution is not just two-dimensional. While most images tend to be archived in 8-bit format, offering 256 distinctive levels per channel, most scanners and digital cameras capture images at 12 or 16 bit per channels. Storing images in 16-bit format increases the number of distinctive levels per channel to 65566 – or 256 times as many as 8-bit. But, the file size only doubles.
Depending on how images are acquired (digital cameras, scanners or imported from existing archives) compromises on resolution will often have to be reached with respect to capture and transmission time, as well as storage requirements. But, please take a few moments to reflect on how fast the average storage and processing capacity as well as network bandwidth have increased in the past few years. Before you set your standards too low.
The resolution of a digital master image should be as high as possible.
Compression
Another factor directly affecting the quality, and thus the value of a digital master image, is the compression method being used to reduce the size of an image file. Compression is used to reduce the time it takes to transfer an image as well as the need for storage space. Compression methods fall in two categories:
- Lossless. Non destructive compression. When the image is later decompressed it will be exactly the same as the original and no information has been lost. Common examples of lossless compression methods are “ZIP” and “LZW”. On average you can expect a 1:2 compression rate using these methods.
- Lossy – or “Virtually lossless”. In order to achieve a particular quality or size, more or less of the least noticeable details in the image is permanently removed. Every time the image is opened and saved (decompressed and compressed) the quality degrades slightly. Common examples of lossy compression methods are JPEG and JPEG2000. On average you can expect a compression rate of 1:10 for JPEG and 1:25 for JPEG2000 while maintaining an acceptable quality.
Naturally a lossless compression method yields the most valuable master image, but again compromises may have to be reached with respect to transmission time and storage requirements.
A collection of digital master images may require the use of several different compression methods.
Metadata
Metadata – or “data about data” – is all kinds of data describing the image itself. Common examples of metadata which can be embedded into an image are:
- EXIF information from a digital camera. The EXIF standard covers a wide range of information such as when and where (GPS coordinates) the picture was taken and all the technical details about the equipment and settings in use.
- IPTC information. Manually entered information about the objects in the image and the occasion on which it was captured, as well as copyright information, categories, searchable keywords etc.
For anything except tiny images optimized for use on the internet, metadata is relatively compact and adds very little to the overall size of an image file.
Embedding metadata inside your master image files makes a big difference as long as the metadata complies with common standards. By keeping the information inside the image file, the file becomes an autonomic object which can be exchanged between different systems with ease. The associated information always travels with the image, so to speak.

Whenever possible, Metadata should travel along with the image file.
Separating image and metadata can turn out to be a very effective vendor lock-in if the metadata is kept within a proprietary database.
A digital master image must preserve metadata whenever possible.
Color Management and ICC profiles
The information on how to interpret the color values of an image is crucial. Without this information every reproduction will have to be based on an educated guess and the result might very well be disastrous.
Fortunately the ICC standard defines how to describe color and embed this information inside an image file. Every image – even tiny images for the internet – must have an embedded ICC profile when possible, so that the receiving system can reproduce it properly.
Some ICC profiles describing CMYK colors (a combination of cyan, magenta, yellow and black ink) for use on printing presses tend to be somewhat large (several Mb) while the rest are relatively compact and doesn’t add much to the overall size of an image file.
Do not consider stripping the ICC profiles of CMYK images in order to reduce the size of the image files. If you are concerned about the size of your CMYK files, you should ask yourself why the images ended up as CMYK in the first place.
You may have been told otherwise – but the truth is that all color scanners and digital cameras capture data as RGB (red, green, and blue) in the first place. If the output from a scanner is CMYK it has beyond doubt been converted from RGB to CMYK by the scanner software.
The variety of colors which can be reproduced on a printing press or another device is called the color gamut of the device. The gamut of a CMYK printing press is very different from and small compared to the gamut of a scanner or digital camera. During the conversion from RGB to CMYK the gamut is compressed in order to get the best overall appearance on the printing press. This is a one-way process in which information is lost for good, and there is no way to get the original colors back. On average the CMYK image will appear less saturated than the original when converted back to RGB.

Color gamut examples for RGB (left) and CMYK (right).
This may not be a problem at all, as long as you don’t want to reproduce the image on a device with a larger or different gamut than the CMYK printing press for which the image was intended in the first place. But keep in mind that one of the key goals of the digital master is to ensure the highest level of reuse and re-expression. Converting the original RGB image to CMYK intended for a specific printing method and throwing away potentially valuable color information in the process is not a good starting point for a digital master image.
Instead the image should be kept in its original RGB format and then later converted to CMYK or whatever color formats future reproductions may require. All conversions introduce rounding errors and affects quality, so don’t do it until you have to.
“Standardizing” by converting existing image files to a new standard color space is a common misunderstanding. Remember that color management is about keeping track of what colors you have, so that you know how to convert them, if and when you have to. Converting colors in advance will not make the end result any better – only worse.
A digital master image must have an embedded ICC color profile and its initial gamut should be preserved whenever possible.
To avoid unnecessary and harmful conversion of existing images the image file format used should support common color spaces such as RGB and CMYK.
Composed images – more than pixels
After the digital image is captured by a scanner or digital camera it is likely to undergo some level of retouching and color correction in an image editing application like Adobe Photoshop.
This is often necessary in order to remove scratches, dust, and red eyes or to compensate for a colorcast caused by tricky lighting.
But modern image editing applications are often used to do much more than mere retouching and color correction. Creative image professionals compose images by means of layers, paths, masks, effects and they often add text to the image. All these elements can be stored when the file is saved. When the image is reopened later these elements can be removed, moved or hidden and text may be edited. Even color adjustments can be made by means of adjustment layers so that the underlying original is preserved and can be restored at a later time.
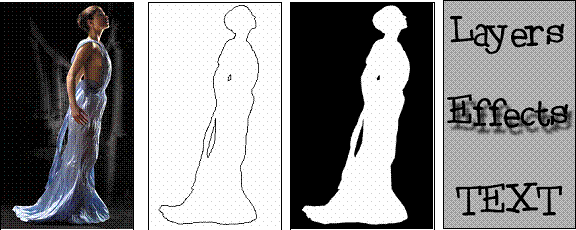
A composed image contains valuable creative elements in addition to pixels.
Image copyright © Guzikowski.
A composed image often represents a substantial investment in time and has a high potential for reuse if the individual text, layers and other elements can be retrieved and manipulated at a later time. These extra elements may increase the size of the image file substantially. But if they can’t be saved along with the digital master, they will either be lost, or end up as an unofficial “master master image” hidden somewhere else.
A digital master image must preserve layers, paths, text, effects and other creative elements whenever possible.
Standard and patent issues
Technology evolves rapidly and what once was as a common standard may soon become obsolete. Many people still have data stored on the 5¼ inch floppy disks which were common in the early 90s – but today it is very difficult to find a suitable floppy drive to read them.
To some extend the same situation exist with software packages and the file formats they use to store data. The more proprietary, patented or overly complex a file format gets, the more likely it is that you won’t be able to find an application capable of reading it in just 5 or 10 years. If at the same time a detailed description of the particular file format isn’t available you may suddenly find that your data is worthless.
Keep in mind that vendors promoting their new revolutionary, patented and proprietary format may have no interest in you leaving their software behind and taking your data with you.
Using common formats controlled by independent standard bodies may the safest way to ensure that your data doesn’t become unreadable. A format controlled by a single vendor may also be a good choice as long as it has been adopted by other vendors, is widely used and not at least: the specification must be available to the public.
To the benefit of everybody in the industry, Adobe has been very successful in establishing de facto standards such as Adobe PostScript and Adobe PDF. Similarly Adobe Photoshop didn’t become the de facto image editing application just because it was the greatest product on the market. Part of Photoshop’s initial success was due to the freely available Software Development Kit (SDK) that allowed 3rd party developers to extend the functionality with Plug-Ins and to read and write the proprietary file formats used by Photoshop.
For a decade the Photoshop SDK was freely available to anyone. But with the release of Photoshop 7.0, Adobe changed their policy with regards to who may access the SDK. Currently, the SDK is available to Adobe Solutions Network Developer Program (ASN) members only - and Adobe reserves the right to deny access to anyone for any reason. The underlying reason for this change in policy remains unknown.
Fortunately Adobe Photoshop can read and write images in open formats like TIFF as well as the proprietary PSD format. You can convert existing PSD files to TIFF format without loosing any information.
The TIFF format was first published by Aldus back in 1986 and is among the most versatile, reliable, and widely supported bit-mapped formats. The beauty of TIFF is that it can be extended with proprietary data such as Photoshop layers and text, but at the same time remain compatible with other applications. For instance, even a highly complex image composition with numerous layers, texts and effects can be read directly by applications such as Microsoft Word or PowerPoint – as long as the image is stored in TIFF format.
A digital master image must be stored in widely supported standard format.
Resolution independence and real-time rendering
In order for dynamic imaging applications such as the eRez Imaging Server to create variations of a digital master image in real-time, high resolution images must be “resolution independent”.
Resolution independent means that the image data is organized inside the file in a way that makes it possible to retrieve image data at various resolution levels in an efficient manner.
Let’s say that we need to create a small JPEG image for use on a web page from a 100 Mb master image. If the image is stored in a standard single-resolution format such as EPS, JPEG or PSD, then the server will have to read the complete 100 Mb of data and then carry out a time consuming down sampling in order to create an image with the required resolution. This approach would require very powerful and expensive server hardware in order to get an acceptable response time and is not a practical solution.
A straightforward and very efficient way to get resolution independence is by storing image data at multiple resolution levels inside a single file. This will lead to a 30% increase in file size – but a dynamic imaging server will be able to serve images a hundred or even a thousand times faster than when using a single-resolution image.
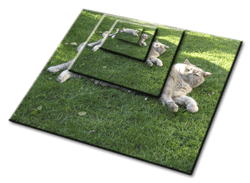
An image pyramid contains image data at multiple resolution levels.
Some examples of image file formats with support for image pyramids and their history are:
- KODAK Photo CD ImagePac. A proprietary format developed by KODAK in 1992. A number of applications can read Photo CD ImagePac files, but very few (if any) are capable of writing them.
- IVUE. A now obsolete proprietary format developed by Live Picture in 1993.
- FlashPix. Originally developed by KODAK, Live Picture, HP and Microsoft in 1996. Now an open standard controlled by the I3A organization. FlashPix was supported by Adobe Photoshop version 5.0, but is not supported by version 6.0 and 7.0.
- TIFF. Support for image pyramids was added in 1996 and is supported by Adobe Photoshop 6.0 and later.
Resolution independence can be reached by other means than image pyramids. Such examples are JPEG2000 and some fractal compression schemes. In general these formats require substantially more processing by the image server and is less suited for real-time use.
A digital master image must be stored in a resolution independent format.
Tiled Layout
The way an image is organized and compressed internally also makes a big difference when extracting portions of an image in real-time. Some images are stored as one big chunk of data while others are stored are divided into rectangular chunks that can be read, decompressed and processed individually. The optimal layout is a tiled layout where the image is divided into quadratic tiles with a dimension in the range of 128-512 pixels. Especially for files with a size of 50 Mb or larger zooming at high resolution is much faster and requires fewer resources on the server than a file stored as one big chunk or horizontal strips.
A digital master image must be organized as tiles.
Summary
To summarize what makes an ideal digital master image:
- It must have a sufficiently high resolution to be used for all purposes.
- It must be stored in a format that supports both lossless and lossy compression.
- It must contain embedded metadata such as IPTC and EXIF.
- It must contain a correct ICC color profile and sufficient color gamut.
- It must be stored in a format that supports common color formats such as RGB and CMYK.
- It must be stored in a format that preserves creative elements such as layers, paths, effects and text.
- It must be stored in a widely supported format defined by an open standard.
- It must be resolution independent.
- It must support tiled layout.
The table below contains a feature by feature comparison of some of the image file formats candidates for digital master images.
|
Formats/Features |
TIFF |
FlashPix |
JPEG |
PSD |
EPS |
|
16 bit data per channel |
X |
|
|
X |
|
|
Efficient Lossless compression |
X |
|
|
|
|
|
Lossy compression |
X |
X |
X |
|
X |
|
IPTC and EXIF metadata |
X |
|
X |
X |
X |
|
ICC color profile |
X |
|
X |
X |
X |
|
RGB |
X |
X |
X |
X |
X |
|
CMYK |
X |
|
X |
X |
X |
|
Creative elements |
X |
|
|
X |
|
|
Open standard |
X |
X |
X |
|
X |
|
Resolution Independent |
X |
X |
|
|
|
|
Tiled Layout |
X |
X |
(X) |
|
|
Only the TIFF format supports all the features that make an ideal digital master image.
As you can see the TIFF format supports every single feature of the ideal digital master image format. This is why TIFF has been chosen as the preferred format for use with the eRez Imaging Server. All commonly used formats including JPEG, EPS and PSD can easily be converted to TIFF without loss.
Secondly eRez supports the FlashPix format which is the second best resolution independent format.
Finally eRez supports JPEG images at low to medium resolution. The maximum size of JPEG images that eRez will handle can be configured. But for obvious reasons JPEG is not recommended for storing high resolution images.
Preparing resolution independent TIFF images
Automatic conversion using the eRez Imaging Server
A straight forward way to convert JPEG or TIFF images without image pyramids to resolution independent TIFF files is to upload them to the server via the Web Interface. Files can be uploaded directly as they are received from a Digital Camera or scanner.
When the files have been uploaded the server will automatically convert them to resolution independent TIFF files while preserving IPTC and EXIF information.
Only a standard web browser is required and new images can be uploaded from an internet connection anywhere.
Automatic conversion using Khufu and Adobe Photoshop
Khufu is a utility developed by YaWah.com that can be downloaded from the YaWah.com website and used free of charge.
Khufu makes it simple to batch convert any of the many file formats supported by Adobe Photoshop and at the same time preserved the existing folder hierarchy. Khufu can operate unattended and will automatically detect when new files are added or existing files are updated. Khufu makes it simple to convert large existing archives or maintain a “shadow copy” of files in other formats.
Khufu requires a Windows PC with Adobe Photoshop 7.0.
Using Adobe Photoshop 7.0 or later
To save an image in TIFF format choose "Save As" from the File Menu and specify TIFF as format. After you have selected "TIFF" as format you can choose if you want to embed an ICC profile in the output file and if You want to preserver multiple layers, if any. You should ALWAYS embed an ICC profile to be used by the eRez Imaging Server and other ICC profile aware applications. Check "Layers" if you want to preserve the Photoshop Layers in the image for later editing - but be aware the file will be somewhat larger.
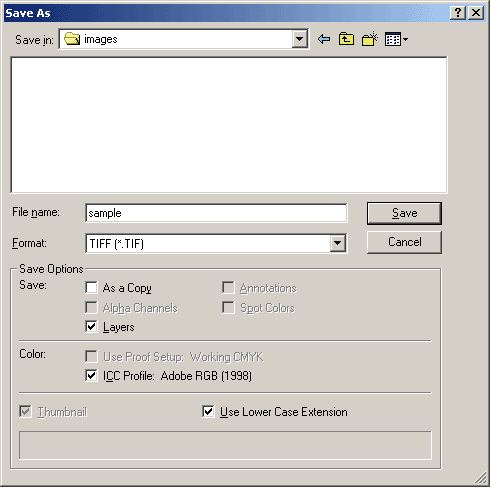
Saving an image as TIFF from Adobe Photoshop's Save dialog.
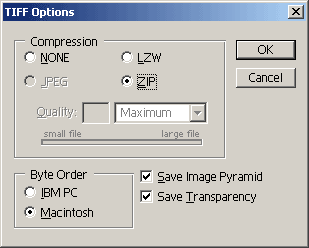
After choosing "Save" You will need to choose the compression method, if an image pyramid should be saved and whether or not to save the transparency of the image as an alpha channel. You should ALWAYS check "Save Image Pyramid" if you want to use the image with the eRez Imaging Server. Failure to do so will slow down the server and the server considerably. The image pyramid data is completely backwards compatible and does not prevent other applications to read the file even if there is no support for image pyramids. You should check "Save Transparency" if your image is partly transparent.
The eRez Imaging Server can use images compressed with all 4 methods. Most applications can read uncompressed images (NONE) and LZW is also widely supported - but not all applications can read ZIP or JPEG compressed TIFF files. JPEG offers the highest compression ratio through "visually loss less" compression. LZW and ZIP offers loss less compression with an average compression ratio at about 50%.
No compression requires additional storage space but gives slightly better performance with the eRez Imaging Server because the decompression can be skipped when reading the image data.
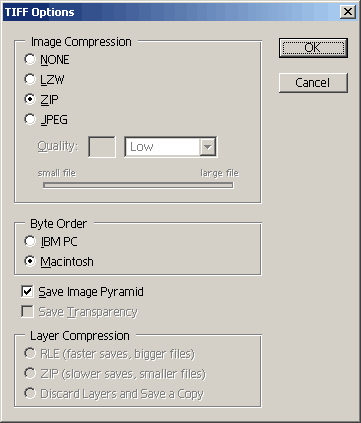
Specifying the TIFF options while saving a TIFF file from Adobe Photoshop 7
Using Adobe Photoshop 6.0
Before you can save TIFF files with the pyramid extensions from Adobe Photoshop 6 You must enable the "advanced TIFF save options" option from the Adobe Photoshop preferences dialog.

The "Saving Files" panel from the Adobe Photoshop 6 preferences dialog.
To save an image in TIFF format choose "Save As" from the File Menu and specify TIFF as format. After you have selected "TIFF" as format you can choose if you want to embed an ICC profile in the output file and if you want to preserver multiple layers, if any. You should ALWAYS embed an ICC profile to be used by the eRez Imaging Server and other ICC profile aware applications. Check "Layers" if you want to preserve the Photoshop Layers in the image for later editing - but be aware the file will be somewhat larger.
Saving an image as TIFF from Adobe Photoshop's Save dialog.
After choosing "Save" you will need to choose the compression method, if an image pyramid should be saved and whether or not to save the transparency of the image as an alpha channel. You should ALWAYS check "Save Image Pyramid" if you want to use the image with the eRez Imaging Server. Failure to do so will slow down the server and the server considerably. The image pyramid data is completely backwards compatible and does not prevent other applications to read the file even if there is no support for image pyramids. You should check "Save Transparency" if Your image is partly transparent.
The eRez Imaging Server can use images compressed with all 4 methods. Most applications can read uncompressed images (NONE) and LZW is also widely supported - but not all applications can read ZIP or JPEG compressed TIFF files. JPEG offers the highest compression ratio through "visually loss less" compression. LZW and ZIP offers loss less compression with an average compression ratio at about 50%.
No compression requires additional storage space but gives slightly better performance with the eRez Imaging Server because the decompression can be skipped when reading the image data.
Specifying the TIFF options while saving a TIFF file from Adobe Photoshop 6
Preparing FlashPix images
Using Adobe Photoshop 5.0 and 6.0
Adobe Photoshop version 5.0 comes with support for the FlashPix format by means of a Plug-in. This Plug-in is no longer shipped with Adobe Photoshop version 6.0 - but the FlashPix Plug-in from version 5.0 seems to work well with Adobe Photoshop 6.0 on both Macintosh and Windows systems any may well work with version 7.0 as well. You must manually copy the Photoshop 5 FlashPix Plug in to the Plug-ins folder of Photoshop 6.0.
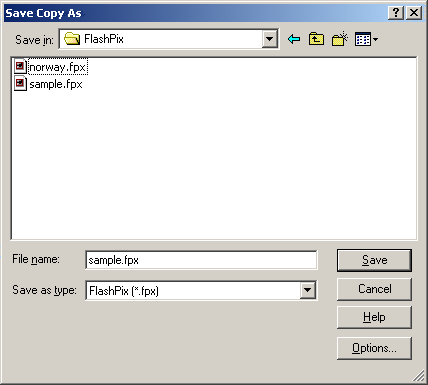
Creating FlashPix images from Photoshop is straight forward. Simply choose "Save As" from the "File" menu and specify "FlashPix" as the format.

Saving an image as FlashPix from Adobe Photoshop's Save dialog.
Before the image is saved you will need to specify the compression method. You can choose between "NONE" (uncompressed) as well as JPEG compression. If you want to apply JPEG compression (the normal case) you will need to specify the quality/compression level as well. A value of 8 or greater is recommendable in most cases.
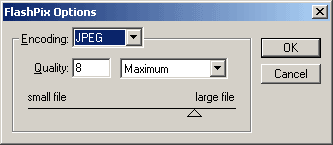
The FlashPix Save options from Adobe Photoshop.
Using Paint Shop Pro 7.0
Creating FlashPix images from Paint Shop Pro 7.0 is straight forward. Simply choose "Save As" from the "File" menu and specify "FlashPix" as the format.
Saving an image as FlashPix from Paint Shop Pro's Save dialog.
Before You click the "Save" button You might want to check the settings for FlashPix under "Save Options". You enter the "Save Options" dialog by clicking the "Options" button in the "Save" dialog after choosing FlashPix as the format. As with Adobe Photoshop You can either use JPEG compression or save the file uncompressed. Notice that the direction of the quality/compression slider is reversed compared to Photoshop.
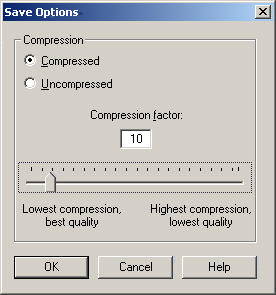
The FlashPix Save Options from Paint Shop Pro 7.